|
Filtering Your Photos
Filters can have a big impact on your images, and circular polarizing filters are surprisingly easy to use.
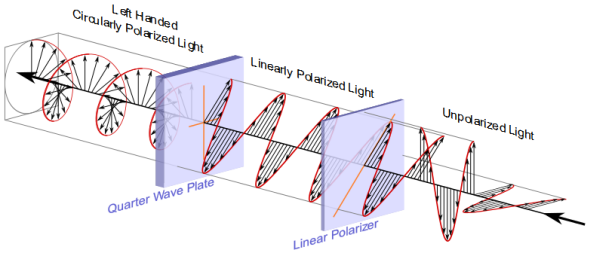
Polarizing filters can remove reflections off of water, glass and other surfaces, remove haze from the sky, and intensify color. Tiffany Gaidica, part of the LensGiant staff, breaks down polarizing filters for you, making them easy to understand.  The polarizing filter is used on the right to remove the reflection from the surface of the water. Light waves moves in all different directions. When light is reflected off of a surface, the light becomes polarized light. Polarized light waves move in one direction or are aligned parallel to one and other. You can block those angles of light and filter out those specific light waves from getting to your cameras sensor with polarizing filters. The more reflective the surface is in your scene, the greater impact the filter will have on the outcome of your image. So what is the difference between a linear and circular polarizing filter? A linear polarizing filter has one plate, that when rotated, will block out linearly polarized light.  You can adjust the amount of light that gets through as you turn the filter. All modern DSLR bodies have a beam splitter to split or disperse the incoming light to the AF system, view finder, and metering system. It's shaped like a plus sign +. This requires the light to have to be distributed on horizontal and vertical planes. If the incoming light is polarized linearly it will not be able to be properly dispersed by the beam splitter. This causes the AF system to think the light is too low to be supported and the meter will force the camera to use a larger aperture /slower shutter speed.  Linear and circular polarization[/caption] To combat this compatibility issue, a second plate is added to 're-polarize' (redistribute) some of the linear polarized light so that it becomes circular and can be distributed through the beam splitter and hit the sensor. Circularly polarized light may be produced by passing linearly polarized light through this second plate. This filter containing two plates is called a circular polarizing filter.  The polarizer will have the greatest effect if you can keep the sun or light at 90 degrees to you. Filters are available in many diameters to fit many different lens sizes. They screw on to the front of the lens and you simply rotate the front element of the filter until you have reached the desired effect and take the photograph. The filter will also provide protection for the glass on your lens. (If you are just looking for something to protect the glass, a UV filter will do the trick without any impact on your images.) Keep in mind 1) Polarizing filters change the exposure needed for the picture. You will need to use a larger aperture or longer shutter speeds. You may also want to set the white balance to daylight and consider applying negative exposure compensation to prevent your camera from counteracting the effect of the filter. 2) It is not advisable to use a filter on overcast days, in low light or at night as it cuts down the amount of light that will get through to the sensor (Since some light has already been discarded.)  Polarizer used in the right photo filters out polarized component of light from the sky, increasing contrast. A polarizing filter is an extremely useful item to keep in your bag, fun to experiment with, and can give you a new eye to see your subjects with. They can be quite expensive to purchase, ranging from $30-$200, so renting one is always a great option. To see our selection of polarizing filters and to rent your own, click HERE.  Click the image above to see our full selection of polarizing filters |